파일 탐색기에서 공유 링크 생성하기
해당 문서에서는 Chat GPT에 질의하여, 시놀로지 API를 이용한 공유 링크 생성법에 대해 다룬다.
먼저, 구현하고자 하는 것은 다음과 같다.
- 파일 탐색기에서 원하는 파일/폴더를 우클릭하여 공유 링크를 생성하기.
- 만료일을 n일로 지정하기.
- 생성된 공유 링크를 자동으로 클립보드에 붙이기.
1. PowerShell 코딩
해당 챕터의 내용은 모두 Chat GPT로 얻은 결과임을 알립니다.
따라서 정확한 원리와 과정은 필자도 모릅니다.
먼저, 작성해야 할 파워셸 스크립트의 완성본은 다음과 같다.
# Synology NAS 정보 설정
$nasUrl = "http://input.your.nas.ip:5000"
$username = "yourID"
$password = "yourPW"

# URL 인코딩 함수
function UrlEncode {
    param (
        [string]$string
    )
    return [System.Uri]::EscapeDataString($string)
}

# 비밀번호 및 경로 인코딩
$encodedPassword = UrlEncode $password

# 날짜를 yyyy-mm-dd 형식으로 반환하는 함수
function Get-DateAfterDays {
    param (
        [int]$Days
    )
    $futureDate = (Get-Date).AddDays($Days)
    return $futureDate.ToString("yyyy-MM-dd")
}

# 파일 경로 변환 함수
function Convert-FilePath {
    param (
        [string]$filePath
    )
    # Windows 스타일 경로를 Unix 스타일로 변환
    $unixPath = $filePath -replace '^[A-Z]:', '' -replace '\\', '/'
    return $unixPath
}

# 스크립트가 받을 파일 경로
$filePath = $args[0]  # 파일 경로를 파라미터로 받음
if (-not $filePath) {
    Write-Error "File path not provided."
    exit
}

# 경로 변환
$filePath = $filePath.Trim('"')
$convertedPath = Convert-FilePath $filePath
$encodedPath = UrlEncode($convertedPath)

# 만료일 계산 (값을 수정하여 만료일 지정)
$dateExpired = Get-DateAfterDays 3
$encodedDateExpired = UrlEncode($dateExpired)

# 1단계: 인증 토큰 얻기
try {
    $loginResponse = Invoke-RestMethod -Uri "$nasUrl/webapi/auth.cgi?api=SYNO.API.Auth&version=3&method=login&account=$username&passwd=$encodedPassword&session=FileStation&format=sid" -Method Get
    if ($loginResponse.success -ne $true) {
        Write-Error "Login failed. Error Details: $($loginResponse.error.message)"
        exit
    }
    $sid = $loginResponse.data.sid
} catch {
    Write-Error "An error occurred during login. Error Details: $_.Exception.Message"
    exit
}

# 2단계: 공유 링크 생성
try {
    $createResponse = Invoke-RestMethod -Uri "$nasUrl/webapi/entry.cgi?api=SYNO.FileStation.Sharing&version=3&method=create&path=$encodedPath&date_expired=%22$encodedDateExpired%22&format=sid&_sid=$sid" -Method Get

    if ($createResponse.success -ne $true) {
        Write-Error "Failed to create share link. Error Details: $($createResponse.error.message)"
        exit
    }
    $linkId = $createResponse.data.links[0].id
} catch {
    Write-Error "An error occurred while creating share link. Error Details: $_.Exception.Message"
    exit
}

# 3단계: 링크 정보 확인
try {
    $getInfoResponse = Invoke-RestMethod -Uri "$nasUrl/webapi/entry.cgi?api=SYNO.FileStation.Sharing&version=3&method=getinfo&id=$($linkId)&format=sid&_sid=$sid" -Method Get

    if ($getInfoResponse.success -ne $true) {
        Write-Error "Failed to retrieve share link information. Error Details: $($getInfoResponse.error.message)"
        exit
    }

    # 필요한 공유 링크 정보만 출력
    Write-Output "ID: $($getInfoResponse.data.id)"
    Write-Output "File name: $($getInfoResponse.data.name)"
    Write-Output "File path: $($getInfoResponse.data.path)"
    Write-Output "URL: $($getInfoResponse.data.url)"
    Write-Output "Date Expired: $($getInfoResponse.data.date_expired)"

    # URL을 클립보드에 복사하기 전에 http를 https로, 포트 5000을 5001로 변경
    $shareLinkUrl = $getInfoResponse.data.url
    $modifiedShareLinkUrl = $shareLinkUrl -replace '^http:', 'https:' -replace ':5000', ':5001'

    Set-Clipboard -Value $modifiedShareLinkUrl
    Write-Output "Modified share link URL copied to clipboard: $modifiedShareLinkUrl"
} catch {
    Write-Error "An error occurred while retrieving share link information. Error Details: $_.Exception.Message"
    exit
}

# 4단계: 로그아웃
try {
    Invoke-RestMethod -Uri "$nasUrl/webapi/auth.cgi?api=SYNO.API.Auth&version=3&method=logout&session=FileStation&_sid=$sid" -Method Get
} catch {
    Write-Error "An error occurred during logout. Error Details: $_.Exception.Message"
}
해당 스크립트는, 다음 챕터에서 다룰 batch 파일과 같이 사용할 때에만 정상적으로 작동한다.
이 스크립트는 batch 파일을 실행하여, 공유 링크를 생성할 파일/폴더의 경로를 얻은 뒤, 다음의 동작을 진행한다.
- NAS에 로그인하여 SID 값을 받아옴.
- 공유 링크를 생성할 파일의 주소를 받음.
- 해당 주소를 API의 규칙에 맞게 수정함.
- 시놀로지의 경로 규칙에 따라, 공유 폴더의 이름으로 시작해야 하므로,
WebDAV 혹은 SMB가 반드시 Root에 연결돼 있어야 함. - EX)
변환 전
"Z:\Archive-Main\test\test.txt"
변환 후
/Archive-Main/test/test.txt
- 시놀로지의 경로 규칙에 따라, 공유 폴더의 이름으로 시작해야 하므로,
- 공유 링크를 생성 규칙에 맞게 생성함.
- 만료일을 지정된 값으로 (현재 3일) 지정함.
- 공유 링크를 생성함.
- 생성된 공유 링크의 정보를 출력함.
- 클립보드에 해당 공유 링크를 가져옴.
시놀로지 API 공식 문서의 75~77page를 Chat GPT한테 학습시켜 진행하였다.
위 스크립트의 최상단 부분을 개인의 환경에 맞게 수정하여 CreateSynologyShareLink.ps1으로 저장한다.
2. batch 파일 작성
다음 내용을 메모장에 작성하고,
C:\로 시작하는 부분의 경로를, 위에서 코딩한 스크립트의 경로에 맞게끔 수정한다.
필자의 경우 C:\users\hinam\CreateSynologyShareLink.ps1 이다.
@echo off
setlocal

:: PowerShell 스크립트 경로 설정
set "SCRIPT_PATH=C:\users\hinam\CreateSynologyShareLink.ps1"

:: PowerShell을 통해 스크립트 실행
PowerShell -NoProfile -ExecutionPolicy Bypass -File "%SCRIPT_PATH%" "%~1"

:: 결과 확인을 위해 일시 중지
pause
endlocal
RunSynologyScript.bat 라는 이름으로 저장한다.
저장 경로는 CreateSynologyShareLink.ps1과 통일하면 편할 것이다.
3. 레지스트리 편집으로 컨텍스트 메뉴 등록
파일 컨텍스트 메뉴
먼저 win + R키를 눌러 regedit을 입력하여 레지스트리 편집기를 연다.
다음 경로로 이동한다.
HKEY_CLASSES_ROOT\*\shell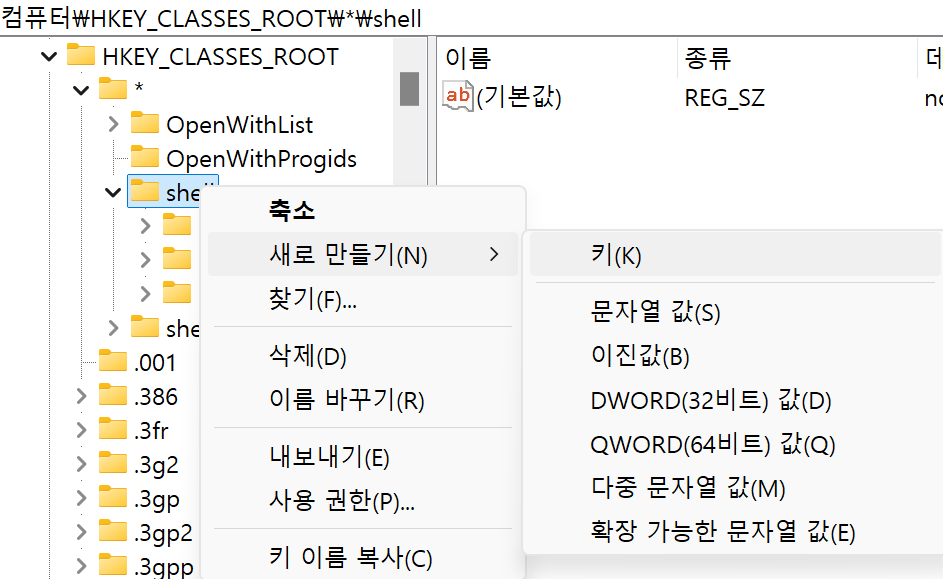
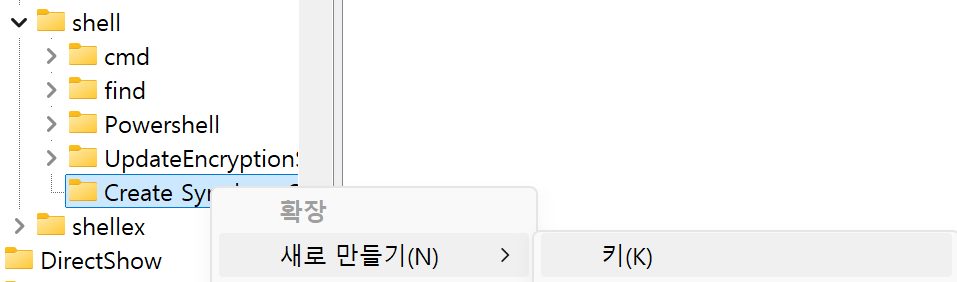
shell을 마우스 우클릭하여 새로 만들기 > 키를 클릭한다.
키의 이름을 Create Synology Share Link로 지정한다.
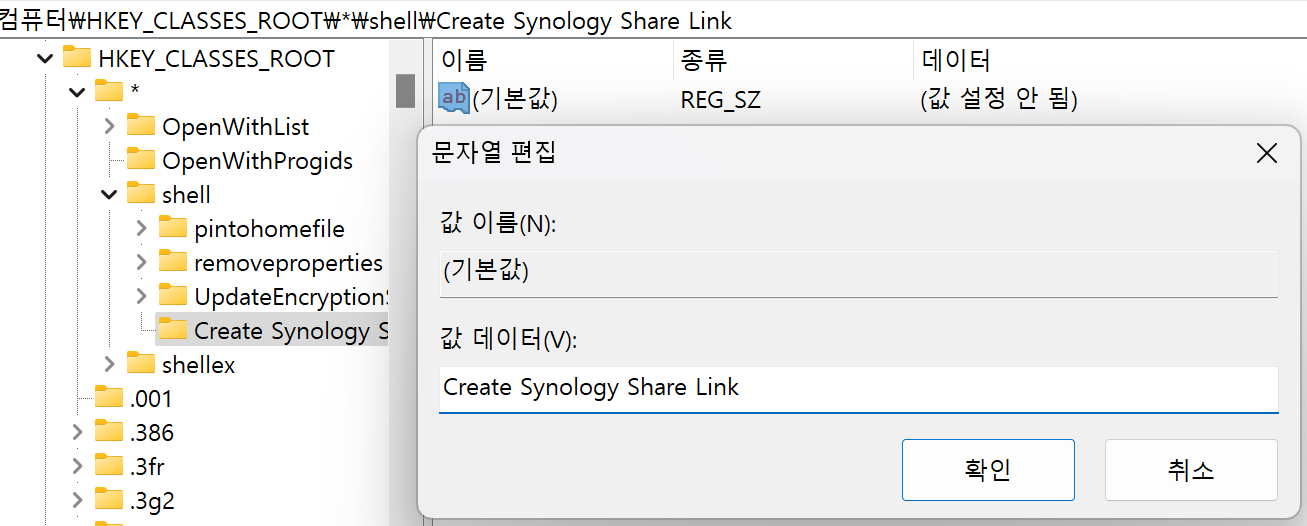
기본값을 더블 클릭하여, 값 데이터를 Create Synology Share Link로 지정한다.
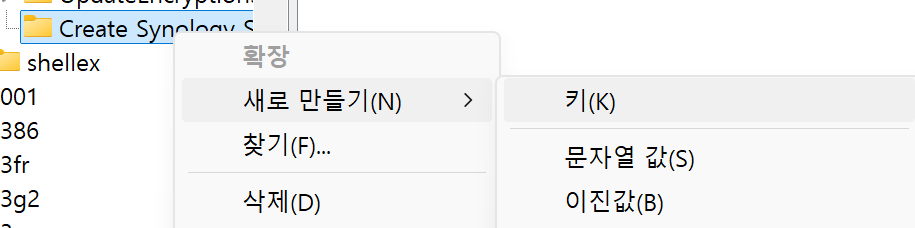
Create Synology Share Link를 우클릭하여 새로 만들기 > 키를 클릭한다.
command로 이름을 지정한다.
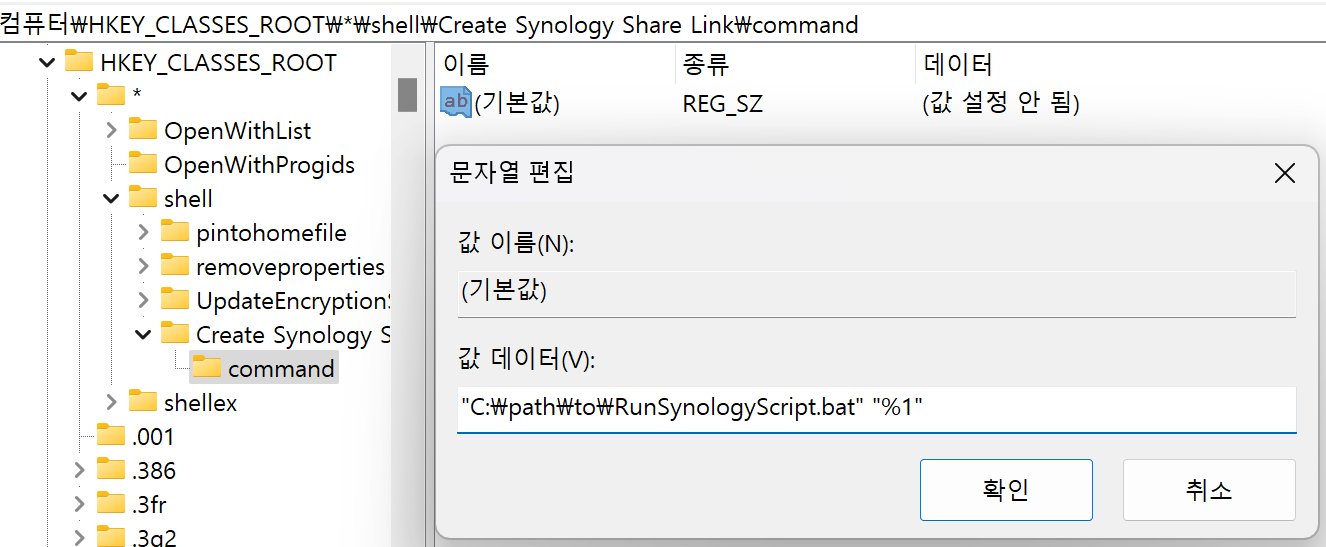
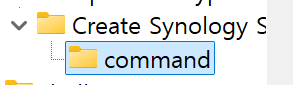
command의 기본값을 더블 클릭하여, 값 데이터를 아래와 같이 작성한다.
"C:\path\to\RunSynologyScript.bat" "%1"C:\path\to 부분을 본인의 경로에 맞게끔 수정한다.
필자의 경우 C:\users\hinam\RunSynologyScript.bat 이다.
폴더 컨텍스트 메뉴
다음 경로로 이동한다.
HKEY_CLASSES_ROOT\Directory\shell
shell을 우클릭하여 새로 만들기 > 키를 클릭한다.
이름을 Create Synology Share Link로 지정한다.
키를 하나 더 생성한다.
이름을 command로 지정한다.
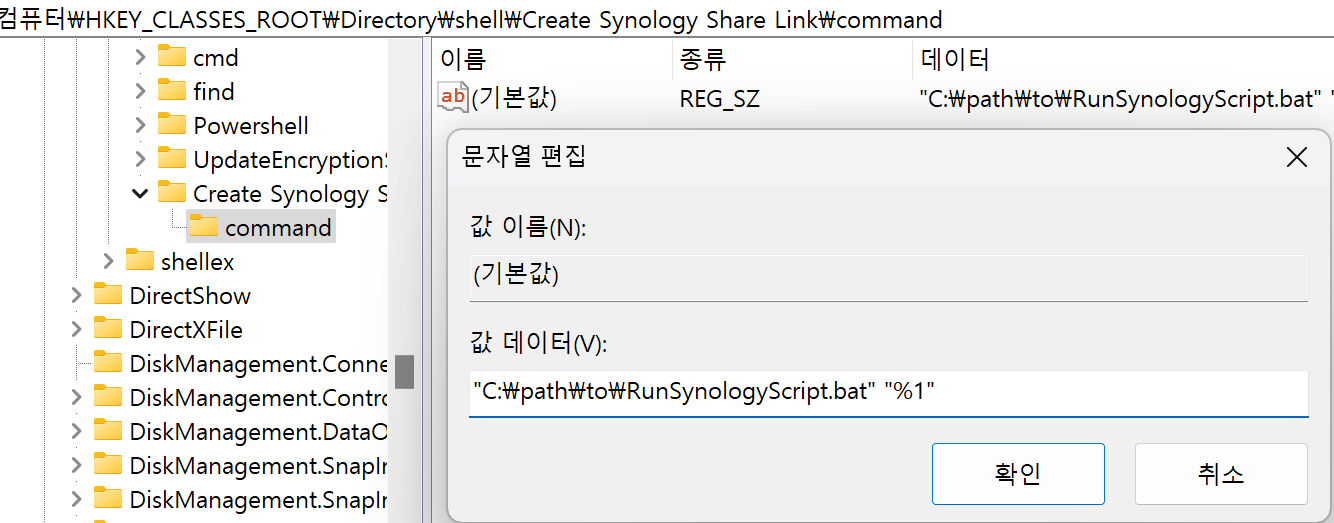
command의 기본값을 더블 클릭하여, 값 데이터에 다음을 입력한다.
"C:\path\to\RunSynologyScript.bat" "%1"본인의 경로에 맞게 수정한다.
필자의 경우 C:\users\hinam\RunSynologyScript.bat 이다.
역방향 프록시
공유 링크가 복사되면 http의 주소와 포트를 가지게 된다.
만약 본인이 http를 사용하지 않는다면, 반드시 역방향 프록시로 http를 https로 넘겨줘야 정상적으로 공유 링크에 접속할 수 있다.
DSM의 제어판 > 로그인 포털 > 고급에서 역방향 프록시를 클릭한다.
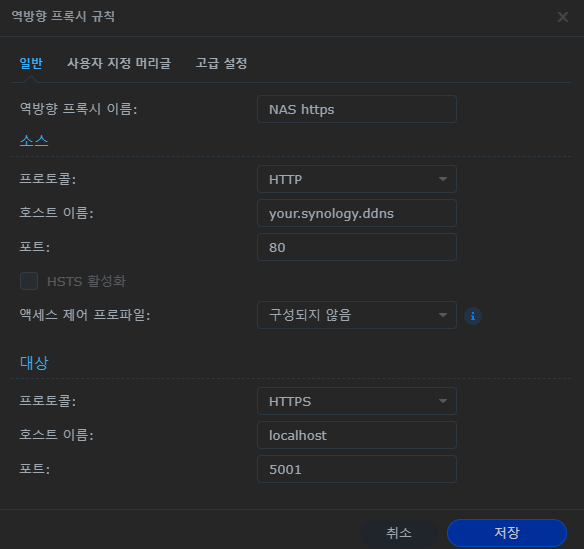
호스트 이름을 NAS의 DDNS로 설정하고,
대상의 포트를 DSM의 https 포트로 지정한다.
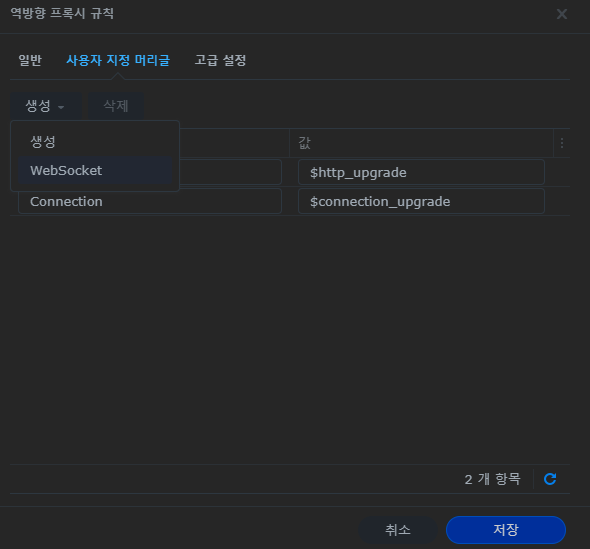
필수 설정인지는 모르겠으나, 사용자 지정 머리글에서 생성 > WebSocket을 클릭하고 저장한다.
고쳐야 할 문제
온갖 방법을 다 동원해 봐도, 파일 명 혹은 경로 명에 알파벳이 아닌 문자열이 있을 경우, cmd 창에 제대로 출력되지 않는다.
이는 UTF-8, krn으로 인코딩하여도 해결되지 않았다.
241105 수정함
아래 코드 만료일 안 됨
# Synology NAS 정보 설정
$nasUrl = "http://your.synology.IP.address:5000"
$username = "Your ID"
$password = "Your PW"

# URL 인코딩 함수
function UrlEncode {
    param (
        [string]$string
    )
    return [System.Uri]::EscapeDataString($string)
}

# 비밀번호 및 경로 인코딩
$encodedPassword = UrlEncode $password

# 날짜를 yyyy-mm-dd 형식으로 반환하는 함수
function Get-DateAfterDays {
    param (
        [int]$Days
    )
    $futureDate = (Get-Date).AddDays($Days)
    return $futureDate.ToString("yyyy-MM-dd")
}

# 파일 경로 변환 함수
function Convert-FilePath {
    param (
        [string]$filePath
    )
    # Windows 스타일 경로를 Unix 스타일로 변환
    $unixPath = $filePath -replace '^[A-Z]:', '' -replace '\\', '/'
    return $unixPath
}

# WebRequest로 요청 보내기 함수
function Invoke-WebRequestWithEncoding {
    param (
        [string]$url
    )

    $webRequest = [System.Net.WebRequest]::Create($url)
    $webRequest.Method = "GET"
    $webRequest.ContentType = "application/json; charset=utf-8"  # 수정된 부분

    try {
        $response = $webRequest.GetResponse()
        $streamReader = New-Object System.IO.StreamReader($response.GetResponseStream(), [System.Text.Encoding]::UTF8)
        $result = $streamReader.ReadToEnd()
        $response.Close()
        return (ConvertFrom-Json -InputObject $result)
    } catch {
        Write-Error "An error occurred: $_.Exception.Message"
        return $null
    }
}

# 스크립트가 받을 파일 경로
$filePath = $args[0]  # 파일 경로를 파라미터로 받음
if (-not $filePath) {
    Write-Error "File path not provided."
    exit
}

# 경로 변환
$filePath = $filePath.Trim('"')
$convertedPath = Convert-FilePath $filePath
$encodedPath = UrlEncode($convertedPath)

# 만료일 계산 (값을 수정하여 만료일 지정)
$dateExpired = Get-DateAfterDays 3
$encodedDateExpired = UrlEncode($dateExpired)

# 1단계: 인증 토큰 얻기
$loginUrl = "$nasUrl/webapi/auth.cgi?api=SYNO.API.Auth&version=3&method=login&account=$username&passwd=$encodedPassword&session=FileStation&format=sid"
$loginResponse = Invoke-WebRequestWithEncoding -url $loginUrl

if ($loginResponse.success -ne $true) {
    Write-Error "Login failed. Error Details: $($loginResponse.error.message)"
    exit
}
$sid = $loginResponse.data.sid

# 2단계: 공유 링크 생성
$createUrl = "$nasUrl/webapi/entry.cgi?api=SYNO.FileStation.Sharing&version=3&method=create&path=$encodedPath&date_expired=$encodedDateExpired&format=sid&_sid=$sid"
$createResponse = Invoke-WebRequestWithEncoding -url $createUrl

if ($createResponse.success -ne $true) {
    Write-Error "Failed to create share link. Error Details: $($createResponse.error.message)"
    exit
}
$linkId = $createResponse.data.links[0].id

# 3단계: 링크 정보 확인
$getInfoUrl = "$nasUrl/webapi/entry.cgi?api=SYNO.FileStation.Sharing&version=3&method=getinfo&id=$($linkId)&format=sid&_sid=$sid"
$getInfoResponse = Invoke-WebRequestWithEncoding -url $getInfoUrl

if ($getInfoResponse.success -ne $true) {
    Write-Error "Failed to retrieve share link information. Error Details: $($getInfoResponse.error.message)"
    exit
}

# 필요한 공유 링크 정보만 출력
Write-Output "ID: $($getInfoResponse.data.id)"
Write-Output "File name: $($getInfoResponse.data.name)"
Write-Output "File path: $($getInfoResponse.data.path)"
Write-Output "URL: $($getInfoResponse.data.url)"
Write-Output "Date Expired: $($getInfoResponse.data.date_expired)"

# URL을 클립보드에 복사하기 전에 http를 https로, 포트 5000을 5001로 변경
$shareLinkUrl = $getInfoResponse.data.url
$modifiedShareLinkUrl = $shareLinkUrl -replace '^http:', 'https:' -replace ':5000', ':5001'

Set-Clipboard -Value $modifiedShareLinkUrl
Write-Output "Modified share link URL copied to clipboard: $modifiedShareLinkUrl"

# 4단계: 로그아웃
$logoutUrl = "$nasUrl/webapi/auth.cgi?api=SYNO.API.Auth&version=3&method=logout&session=FileStation&_sid=$sid"
Invoke-WebRequestWithEncoding -url $logoutUrl
No Comments